Happy New Year! My resolution: keep trying new things in the kitchen.
Done and done. This year should be a breeze!
I never thought I would be able to say, “I made homemade marshmallows”.

But then again, I never really thought much about it at all.
I have other things to think about.
Like cheese. Delicious cheese.
Ahem.
Which is exactly why I’m so excited about the “First on the First” initiative of Kate and Carrie, two wonderful bloggers who inspired me to rise to the challenge of broadening my kitchen horizons. A big reason I started this blog was to motivate me to keep learning and trying new things in the kitchen, and to never get stuck in a baking or cooking rut. Of course, ruts are bound to happen, but challenges like this keep things fresh and interesting!
So, on the first of every month you’ll see a recipe that’s a first for us in the kitchen, and you can check out what other bloggers got up to with the same challenge! What better way to start it off than with marshmallows and a sister day?!
Chelsea happened to be down for Christmas at just the right time to be roped into assisting me, mainly for the moral support of having another face hovering over our bubbling sugar mixture wondering if it looked like 240 degrees on the dot. I really should invest in a candy thermometer, it’s true. But I’m happy to report it was certainly not the necessity I believed it would be for this venture, as our marshmallows could not have turned out more marshmallow-y!
Cooking with Chelsea is always a good time, especially after a couple glasses of wine and some delicious Boursin-stuffed burgers, as my (Very Tall) husband sneakily captured. Please excuse the pile of bottles evident on the counter, I promise those accumulated over a couple months, not over the course of an evening with Chelsea.

So, marshmallows. Does anyone actually really like marshmallows?
I don’t think I do.
I actually bought a bag of marshmallows about a month ago for, I’m gonna say, the second time in the 5 years I’ve been buying groceries. And the bag is still full.
But these homemade marshmallows?? I can totally get on board with these.
Basically, they are still about 99% sugar, but at least there aren’t any chemicals, and they are big, bad, fluffy, squish-in-your-mouth gooey goodness.
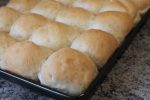
Except you will make them and then look with large, overwhelmed eyes at what you have just unleashed:

A veritable sea of marshmallows! About 100, in fact. 100 giant marshmallows.
They will haunt your dreams if you don’t do something.
So you’ll throw a few under the broiler for 30 seconds. That will be a very good idea.

But you’ll still have 90 marshmallows.
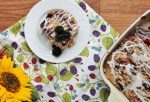
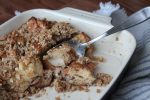
I know what you can do with 40 of them, and it involves graham crackers and chocolate.

Serious sex-in-a-pan s’mores bars. Check back later this week for that recipe, because first you will need to make these delicious marshmallows!

- About 1 cup icing (confectioners') sugar
- 3½ envelopes (2 Tbsp + 2 2½ tsp) unflavored gelatin
- 1 cup cold water, divided
- 2 cups granulated sugar
- ½ cup light corn syrup
- ¼ tsp salt
- 2 large egg whites
- 1 Tbsp vanilla extract
- Spray a 9x13" metal baking pan with cooking spray and dust bottom and sides lightly with some of the icing sugar. Set aside.
- In bowl of stand mixer, sprinkle gelatin over ½ cup cold water, and let stand to soften.
- Meanwhile, in a 3-qt heavy saucepan over low heat, stir together granulated sugar, corn syrup, other ½ cup cold water, and salt with a wooden spoon, stirring until sugar is dissolved.
- When sugar is dissolved, increase heat to moderate and bring to a boil. Let boil, without stirring, for about 11-12 minutes, or until a candy thermometer registers 240F (we did not have a thermometer and went solely on time, and it worked fine).
- Remove pan from heat and pour mixture over gelatin mixture, stirring until gelatin is dissolved.
- Beat mixture on high speed until white, thick, and nearly tripled in volume, about 6 minutes for a stand mixer or 10 minutes for a hand-held mixer. (This is the really cool part where you'll want to invite spectators).
- In separate small bowl, with clean beaters, beat egg whites just until they hold stiff peaks. Add whites and vanilla to sugar mixture and beat just until combined.
- Pour mixture into prepared baking pan and sift ¼ cup of icing sugar over top. Chill marshmallow, UNCOVERED, until firm, 3 hours or more, up to one day or overnight.
- To remove, run a thin knife around edges of pan and invert onto large cutting board. Lifting up one corner of inverted pan, loosen one corner of marshmallows with your fingers and ease the whole thing onto the cutting board.
- Cut into roughly 1" cubes - a lightly oiled pizza cutter works great!
- Sift remaining icing sugar into your now-empty baking pan and roll each marshmallow in it, all six sides, before packing away in airtight containers in a single layer or between wax paper or parchment paper.
- Enjoy as-is, throw in hot chocolate, broil for 30 seconds for a campfire-reminiscent treat, or use in your favorite recipes as you would use any marshmallows.
Homemade marshmallows are SO MUCH easier than you might think, and totally worth every minute. The most time-consuming part is rolling them all in icing sugar, and that’s a perfect job for cute little helpers. I loved trying these – it totally felt like a wildly successful science experiment, and everyone who tried them was genuinely surprised that homemade marshmallows actually tasted like store-bought, Jet-Puffed marshmallows, if not better!
Recipe from Smitten Kitchen.
Check out the other participants’ marshmallows and see how they fared!


CAN YOU USED THE PASTEURIZED EGGS WHITES IN A CARTON TO AVOID ANY FEARS OF RAW EGG TROUBLE?
I’ve actually never worked with the egg whites in a carton, but I assume they would work just fine – let me know if you try it!
I love love LOVE homemade marshmallows! I made them for the first time a couple years ago and was beyond sad that I couldn’t make them this year. (My kitchenaid decided to have a bearing go out in December, are you just devastated for me now?)
I already promised my boys we’d make them later this month, once we have the replacement part for the mixer. There is no way I’m trying them with a hand mixer. LOL!
Those marshmallows are just picture perfect! It’s one of those things that if every marshmallow tasted like a home made one…I’d eat them more often! I’ve never tried making them myself. But you know…a batch of these at the start of fall and think of all the recipes these would be perfect for! For me…I’m happy having them bob around in my cup of cocoa! They look awesome! : )
I made marshmallows once, a very long time ago, and they didn’t look nearly as happy and fluffy as yours! (I also remember a massive pile of sticky pots, bowls, and spatulas.) :D
Great work!! Especially without a candy thermometer! I would love to place a few of those toasted marshmallows on top of a chocolate martini!
Happy New Year, Anna!
I never tried making homemade marshmallows, thanks for the inspiration. Thanks for stopping by my website so I could find yours. Love your website and looking forward to keeping in touch in 2012. BAM
Homemade marshmallows are completely a different animal than those bagged ones from the grocery store, if you can even call them marshmallows after this! Nice job! I can’t wait to see that follow up recipe. :)
I really, really wanted to turn mine into s’mores, but ran out of time. Thinking I need to make another batch just to give ’em a good broil. Yours are drool worthy!
Yeah, I couldn’t believe how delicious they were broiled! Just like camping, without the bugs and walk to the bathroom :)
I have a few marshmallow scraps left over that are just begging to be browned. Thanks for the idea. Pretty marshmallows!
Homemade marshmallows are so much better than the store bought kind. Looking forward to seeing the smores recipes!
They look wonderful. I was planing on making marshmallows for Christmas this year, but I never did. I made them once for the kids like 7 years ago and they still as as young adults, are you making marshmallows. Funny I had a bag of marshmallows in my cupboard for two months, and thats when I decided to make the traditional rice krispie treat with them. But homemade marshmallows are the best, especially in cocoa! Happy New Years!
Your marshmallows look fantastic! I love that you toasted them up and I cannot wait to get my hands on that recipe for those sexy lookin’ smores bars ;) Thanks so much for joining us for #FirstOnTheFirst!
Thanks Kate, and thanks for the idea! Can’t wait to see what else we get to make :)